DNN Redirect by DNN Sharp Documentation

Open Source DNN Module for building Redirects
Precursor of Redirect Toolkit
Source Code Available on Github
Placed on a DotNetNuke page, DNN Redirect will redirect users based on:
- Security Roles
- Referrer URL
- GET/POST parameters
Make sure to also check Redirect Toolkit since it supports a lot more options.
Redirects happen on the server side (using HTTP 302 temporary redirects) or client side using JavaScript redirects with countdown timer.
Table of Contents:
Getting Started
This page guides you through setting up DNN Redirect with a simple redirect that affects all users which are not registered. We will redirect all unregistered users to the Benefits page.
Step 1 - Installation
Note: If you don't already it installed, proceed to Download DNN Redirect FREE Edition
Using DotNetNuke Control Panel, instantiate a DNN Redirect module on the page where you want to redirect users from. Let's assume the redirects module goes on the home page.
Important: For the module to be able to execute redirects make sure ALL ROLES & USERS that will be affected have view rights to the module (this is specified in Module Settings, by default it inherits view permissions from the DNN page). The safest way to proceed is to grant view rights to all users.
To make this module transparent to the end user, just uncheck Display Container option in Module Settings. Note that the only thing displayed by this module for non-administrators are random trial notifications and count down timers if the rules was setup as such.
Step 2 - Setting the Redirect
When you're logged in with an administrator account DNN Redirect module will display the administration interface. There are 3 distinct sections, each representing on type of redirect: Parameter Redirects, Referrer Redirects and Role Redirects.
Note: In Redirect Toolkit all redirect types are created under the same generic interface making the administration interface much simpler and powerful to use. Read more in Redirect Toolkit Getting Started Guide.
To achieve our purpose locate the Role Redirects section, the last of the three sections, and set it up to redirect Unregistered Users to http://yoursite.com/Benefits.aspx page. See picture below for more info.
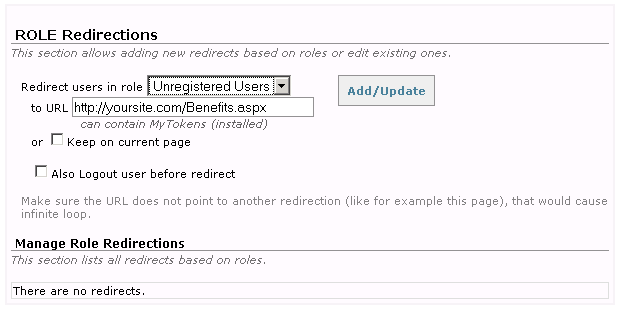
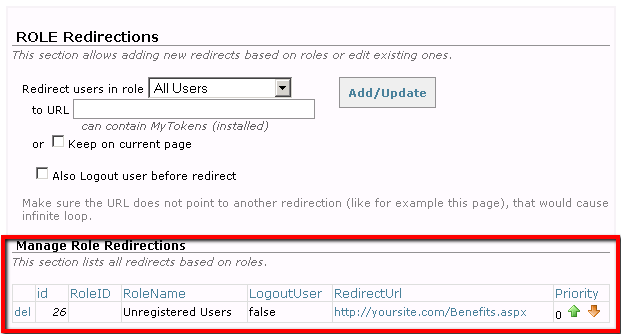
Now, hit Add/Update button to save the redirect in Database. Once added, you should see the redirect added to the list below the form. You will notice there's no edit button in the list. To edit the redirect just fill the form again with Unregistered Users role and a different URL. This will replace existing redirect.
If you followed the steps then your screen should look like in the picture below.
Step 3- Testing
Important:Note that Administrators (or users with edit rights for the DNN Redirect module) will NEVER be affected by redirects. Though we're going to test this rule as an unregistered user, this is good to know in the future as you define more redirects.Testing this is very simple. Make sure you're not logged in on your portal, then access the homepage (or whatever page you created the DNN Redirect module on). If everything is setup correctly, you should be redirect to the Benefits page.
If the redirect doesn't happen, please review all the instructions above or contact us for support on our forums.
Congratulations, you created your first rule! We recommend that you browse the rest of the documentation and experiment with various options.
Logic & Workflow
This section describes how DNN Redirect works. This is good to know in order to achieve best results and avoid inconsistencies.
DNN Redirect implements a fall back mechanism, some rules are before others and the first rule to be found is always used. If no rule matches then the defaults are used.
The order is as follows:
-
PARAMETER Rules- First DNN Redirect checks Parameter Based redirects to see if any matches current context. If so, the redirection happens and the execution ends.
Before checking the conditions DNN Redirect invokes My Tokens to replace tokens inside Parameter Name and Parameter Value fields.
-
REFERRER Rules- Second type of rules that are checked are those based on referrer. Before checking the conditions DNN Redirect invokes My Tokens to replace tokens inside Check Referrer field.
-
ROLE Rules- DNN Redirect checks if there's any rule that matches roles of current user; if any is found, it will redirect to the URL that is associated with the rule.
-
GET Parameter of Current Page- If none of the rules match, DNN Redirect will check the defaults. First, it will check for the named GET parameter in current request. If the parameter is found, then it redirects to whatever value is in that parameter.
-
GET Parameter of Previous Page- Same thing as above happens for the URL of referrer (basically, previous page).
-
Default URL- If no rule matches, then DNN Redirect looks if there's a default URL and redirects there.
-
No Action- If the Default URL is not specified, then the user is allowed on current page.
This basically means you have a logic for this, either to allow only certain roles to access current page or to pass through to DotNetNuke internal logic.
What if for example I want the ROLE rules to be checked before PARAMETER Rules?
Or, with other words, how do you specify the order in which rules are evaluated?
This isn't supported in DNN Redirect, it's only available in Redirect Toolkit(this is possible because Redirect Toolkit features a generic unified interface for all rule types).
However, this can be achieved in DNN Redirect with a work around: create multiple DNN Redirect modules on the page and stack them in the order you want them to run. If a rule from first module matches, a redirect will happen and the second module will not get to execute. But if they don't match, then the second module will run and redirect accordingly and so on.
Sample Usage
Here are some scenarios when DNN Redirect will help:
-
Redirect After Login
Say that after a user logs in, you want to redirect him based on his role: Subscribers should go to My Subscriptions page and Service Providers should go to My Services page.
Easiest way to accomplish this is have a redirect page with a DNN Redirect module on it. In User Settings, you set that all users should be redirected to the redirect page after login. Then, in DNN Redirect settings you add rules for each role accordingly.
Furthermore, you can let other role types follow old logic - that is you can specify a GET parameter that contains an Url to which users will be redirected. In this scenario, you'll set DNN Redirect to read the returnurl GET Parameter of the previous page (the Login Page) and redirect there.
-
Restrict access to certain pages
Usually, you can restrict access to a page but that would redirect unauthorized users to Login page. If placed on that page, DNN Redirect allows you to redirect certain roles to any page, while allowing others that don't match any rule to access the page.
-
Web Wizards
If you have a wizard with many pages and the flow doesn't happen all at once, DNN Redirect can help you trace which step each user should be on. Trick is on each step you alter user roles, let's say we hove two roles for two steps: Step1 role and Step2 role. Then, on each step you add a DnnRedirect module that redirect Step1 roles to first page and Step2 roles to second page. If role is on the right page, then there should be no rule for that role so access will be permitted.
-
Dynamic Redirect
Say you have a role that you want to redirect automatically after login to the latest article. DNN Redirect integrates with MyTokens, so all you have to do is define the token that retrieves latest article the use it in the Url rule for that role. The url will look something like this: /Articles.aspx?id=[LatestArticle:Id])
These are just a few examples, there are a lot more things you can do with DNN Redirect.
And for even more applicabilities make sure to also check Redirect Toolkit.
Settings Explained
Redirect Types
DNN Redirect supports 3 different types of rules based on:
- GET/POST parameters
- Referrer URL
- Security Roles
Parameter Redirects
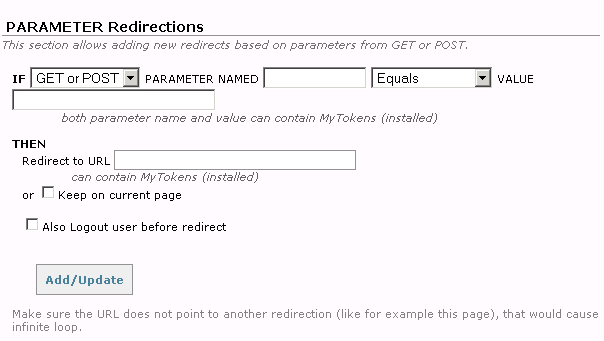
This type of redirect allows matching based on page state. This includes reading and evaluating Query String parameters (from GET operations) and Form Data (from POST operations).
The administration interface for adding Parameter based redirects basically allows to match a named parameter to a specified value using one of the 6 available operators (Equals, Not Equals, Contains, Not Contains, Exists, Not Exists).
Note that Parameter Name and Parameter Value text boxes support My Tokens, making it possible to build dynamic expressions.
Referrer Redirects
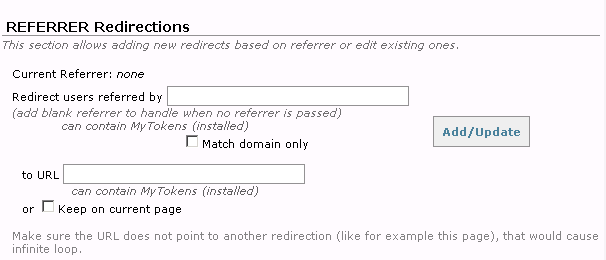
This type of redirect provides capabilities to match based on where the user came from. This gives flexibility to create portals based on referrals, partners, commissions, etc.
Note that referrer textbox supports My Tokens, making it possible to build dynamic expressions.
Common scenarios when this type of redirect is needed include:
- Redirect to different pages based on where the user came from
- Control internal workflow by redirecting users to subpages based on the page they came from (the referrer also works for internal pages, so you can actually determine the page the user came from; based on this, you can transparently redirect the user to see one page or another)
- Trigger special behavior for user that just arrived on the portal
Role Redirects
To define a new rule, you simply select a role from the dropdown (that is built against the database to include all rules on the current portal) and specify a URL to redirect to. Not that you can input anything you like in the URL, so it can be a relative or absolute URL, it can be on any protocol and port, etc.
Furthermore, if you have My Tokens installed, you can include tokens in URL, so you truly turn the redirects into dynamic redirects.
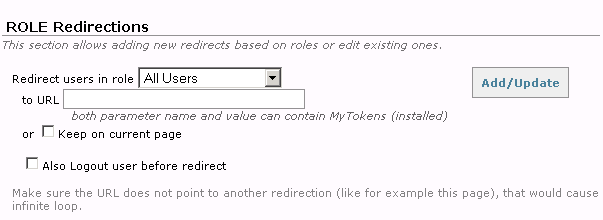
Note that there is no separate edit control for role redirects. Just by adding a new redirect will overwrite any rule that exists for that role.
Also, make sure your redirects will not cause an infinite loop. If you accidentally run into this scenario, then you'll need to manually delete entries in avtRedirect tables in the database.
Manage Role Redirects
In this section redirects can be removed and priorities set. DNN Redirect will parse rules in the order given by their priority. So, for users with multiple role, you have full control to define which one is relevant (or matters most) in terms of redirection. Note that priorities can be both positive and negative. The redirect that has the highest priority number is parsed first.
Fall Back Redirects
These basically define the behavior when no redirect matches for current role. Rules can be added to redirect to value of a GET parameter of current page or previous page. It is common to see ?returnurl like RLs, and DNN Redirect is flexible to let you input the name of that parameter.
Finally, if both the role redirects and the GET parameter redirects have failed, there is a default rule what will redirect to any URL that's provided in there. You can also leaved this blank, in which case you actually decide that certain users should remain on the page while others should be redirected.
Find out more about what benefits you can get from upgrading to Redirect Toolkit